Related Topics
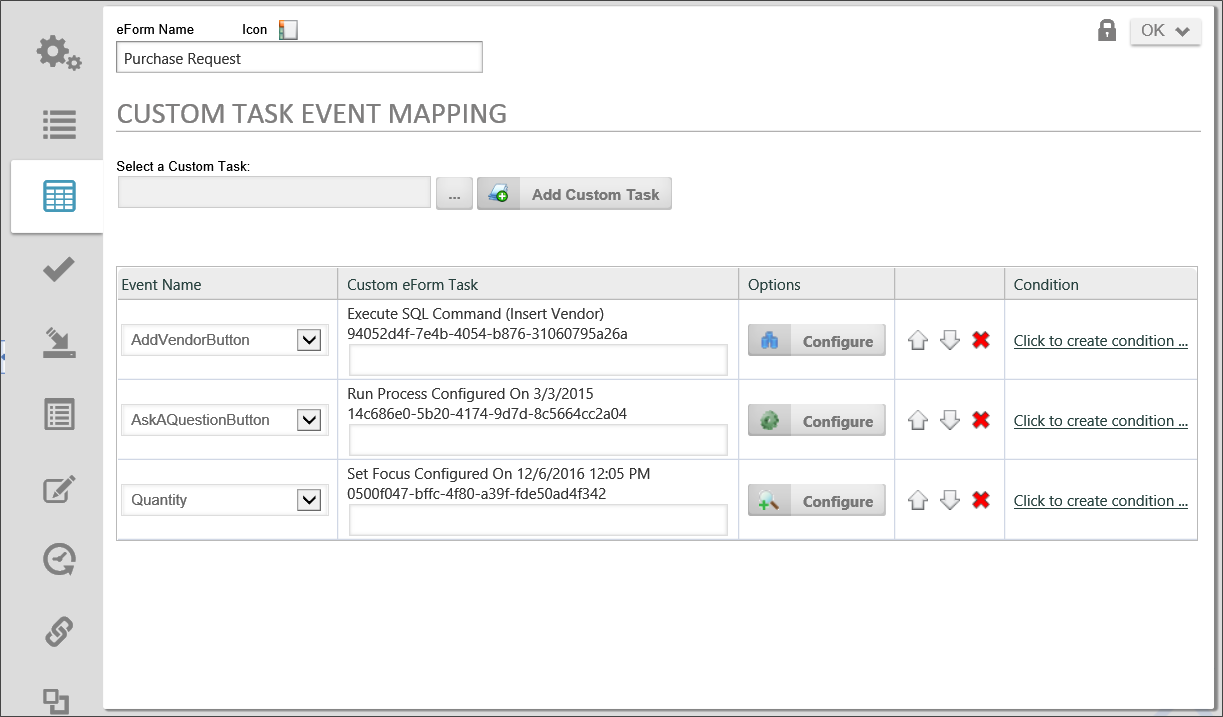
This tab specifies Form Custom Tasks to be mapped to different events that occur when the Form is run. The Form Custom Tasks provide enhanced functions to perform a variety of actions, such as to connect to external data sources or to manipulate data on the form.

Each Custom Task that you map, is mapped to an event that is raised by the Form. The events that are available will appear in the dropdown control that appears in the Event Name column. The Form events that can be mapped to a Custom Task, and the order in which the events will be called, is displayed in the table below.
|
EVENT |
DESCRIPTION |
|---|---|
|
specific form event |
This allows you to tie a Custom Task to a specific form control that is marked as an event field. Every control that is marked as en event field will appear in the dropdown. |
|
[Event] |
Any event from the form (a button, an event field being changed, etc.) will call this event. |
|
[Form Creation] |
This event is only called once per form instance to initialize the form data. |
|
[View State Init] |
This event is called every time a form is opened. It won't be called for postbacks on the current view. |
|
[Before Conditions] |
This event is called prior to evaluating the form conditions (which control the visibility, the required setting, the enabled setting, etc.). |
|
[After Conditions] |
This event is called after evaluating the form conditions. |
|
[Before Validation] |
This event is called if the user hits a complete button, prior to the form validation. |
|
[After Validation] |
This event is called if the user hits a complete button, after the form validation. |
|
[Form Completed] |
This event is called if the user hits a complete button, and the validation was successful. |
|
[Form Display] |
This event is called prior to displaying the form. This will be called on every postback, and when the form is first displayed. |
The order of the events is very specific. For example, If the user changes a dropdown form field which is an event field, the Custom Tasks mapped to events in the following order will be called if configured: specific form event, [Event], [Before Conditions], [After Conditions], [Form Display].
If a user hits the OK button on a form, and the validation succeeds, the events will occur in this order: [Event], [Before Conditions], [After Conditions], [Before Validation], [After Validation], [Form Completed].
If a user hits the OK button on a form, and the validation fails, the events will occur in this order: [Event], [Before Conditions], [After Conditions], [Before Validation], [After Validation], [Form Display].
Click on the Build button for the Custom Task Picker to open the Choose Custom Task dialog box.

From the Choose Custom Task dialog box, select the Custom Task you want to map. When you select the Custom Task, the Choose Custom Task dialog box will close and the name of the Custom Task will appear in the text box of the Custom Task Picker. Click the Add Custom Task button to add the Custom Task to the Form.
The Custom Task Event Mapping tab will now display a new line containing the Custom Task to be configured.
From the dropdown in the Event Name column, select the desired event to tell the Form definition to run the selected Custom Task when the event runs.
We now need to configure the Custom Task by clicking on the Configure button to open the configuration dialog box for the Custom Task.

Each Custom Task has its own, unique configuration dialog box. See the Custom Tasks documentation for information specific to configuring each Custom Task. When you are finished configuring the Custom Task, click the OK button to save your configuration changes and close the dialog box.
Each Custom Task mapping row contains a Condition column, from which you can use the Condition Builder to create an additional condition to meet before the task is run by clicking on the Click to create condition... link.
Each row can be ordered in the list of mapping rows by clicking one of the arrow icons to move the row up or down. The row can be deleted by clicking the red "X" icon. Process Director will execute the Custom Tasks in the order, from top to bottom, in which they are placed in the list.
For Process Director v6.1.300 and higher, custom tasks can be re-ordered using a drag-and-drop mechanism, using a new icon on the right side of the Custom Task Row.

Documentation Example #
More Configuration Tabs
You can view the documentation for each of the other configuration tabs by using the Table of Contents displayed on the upper right corner of the page, or use one of the links below.
Properties: General Form definition properties.
Edit: Opens the editor for the form's visual template, the Online Form Designer.
Form Controls: Enables you to set individual properties for each field on the form.
Validation Rules: Enables you to add custom validation to the form.
Set Form Data: Enables you to set the value of Form fields automatically, based on events or conditions you specify.
Fill Dropdowns: Enables you to automatically set the options available in a dropdown control.
Other Tabs: Documentation for the Form Data SQL View, History, Meta Data, Versions, and Permissions tabs.
Documentation Feedback and Questions
If you notice some way that this document can be improved, we're happy to hear your suggestions. Similarly, if you can't find an answer you're looking for, ask it via feedback. Simply click on the button below to provide us with your feedback or ask a question. Please remember, though, that not every issue can be addressed through documentation. So, if you have a specific technical issue with Process Director, please open a support ticket.

