Related Topics
These Custom Tasks enable you to set data values in a Form, fill fields from Business Value objects, copy data between two different Form instances, and to manipulate arrays on forms on a variety of ways. In addition to these Custom Tasks, some functions, like setting form data, or filling fields from a Business Value, are also provided in the configuration tabs of Form and/or Timeline Definitions, and can be invoked from the definitions directly, instead of being called via a Custom Task.
 Copy Form Data
This Custom Task enables you to create a new instance of a specified Form, then copy data to it from a different Form instance. This Custom Task always creates a new Form instance before copying the data, and does not copy data between two existing form instances.
When invoked on a Form, the Custom Task assumes the Form will be used as the Container Form, which is to say the Form that contains the original data to be copied. When invoked from a Process Timeline as a Custom Task activity, the Custom Task tab of the activity will contain a property named Set Container Form. This property enables you to choose the Form that will be used as the Container Form for the Custom Task. This Custom Task cannot be configured without a Container Form set.

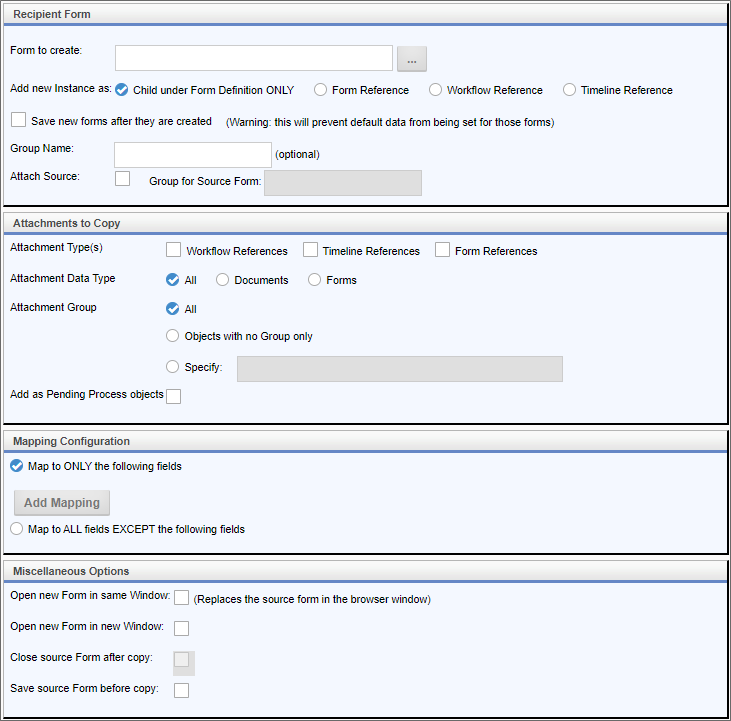
The Form to create property enables you to select the form template into which you wish to copy the data. When the Custom Task runs, a new instance of the selected Form will be created to receive the data.
To select the fields into which you want to copy the data, click on the Add Mapping button to create a new mapping row for each field you wish to copy. For each mapping row, select destination and source Form fields. Alternatively, you can tell the Custom Task to map to all Forms except ones that you specify. This setting will automatically copy data from the source form to the corresponding fields in the destination form, excluding the fields you specify.
Other options can be set to specify how the form is displayed and under what groups and instance types it is created. You can specify the group name of the new form, and what kind of reference it will be, e.g., a Form or Process reference. You can click on the Attach Source checkbox to attach the source Form to the destination form, specifying a new group name for the attachment. Similarly, you can copy of all of the Container Form's document attachments to the new Form.
Configuration Options
|
OPTION |
ATTRIBUTES |
DESCRIPTION |
|---|---|---|
|
Form to Create |
|
Select the form to which the data should be copied from the picker control. |
|
Add new Instance as |
Child under Form Definition ONLY |
The object reference to which to attach the new form. |
| Save new forms after they are created |
This prevents the new version from being treated like a new form instance, meaning that it will immediately show up in Knowledge Views, etc.
|
|
|
Group Name |
|
The Group Name for the new form. |
|
Attach Source |
|
Attach the source form as a reference to the new form instance. |
|
Group for Source Form |
|
The Group Name for the source form. |
|
Attachment Type(s) |
Workflow References |
Attachments to copy to the new form instance. |
| Attachment Data Type | All Documents Forms |
They type of object to attach to the new Form. |
|
Attachment Group |
All |
Group name of the attachments. Selecting "Specify" will enable you to add the desired group name in the text box. |
|
Add as pending process objects |
|
Add the attachments as pending process references instead of form references. |
|
Map to ONLY the following fields |
|
Restrict form field mapping to the field mappings you add by clicking the Add mapping button. |
|
Map to ALL fields EXCEPT the following fields |
|
Restrict form field mapping to exclude the field mappings you add by clicking the Add mapping button. |
|
Open new Form in same Window |
|
Replaces the source form in the browser window. |
|
Open new Form in new Window |
|
Opens the destination form in a new window. For Process Director versions older than v4.55, to enable this option to work as expected in conjunction with the Close source Form after copy property, the fEnableJSURL Custom Variable must be set to "true". |
|
Close source Form after copy |
|
Close the source form after the data has been copied to the new Form. |
|
Save source Form before copy |
|
Save the source form before copying to ensure the most current data is copied. |
 Version 2018.10.26 and below for this Custom Task may incorrectly copy the value of an HTML control between forms. Later versions of this Custom Task, e.g., 2022.XX.XX and above, correct this behavior.
 Fill Fields from Business Value
 This Custom Task was largely deprecated in Process Director v4.5 with the addition of the Set Form Data tab to both Form and Process Timeline definitions, which enable you to fill fields directly from a Business Value without invoking a Custom Task.
For users of Process Director v4.02 and higher, the Fill Fields from Business Value Custom Task enables you to use a Business Value to fill Form fields.

This Custom Task requires the SDK that is delivered with process Director v4.02, and can't be used with earlier versions.
Configuration Options
|
OPTION |
ATTRIBUTES |
DESCRIPTION |
|---|---|---|
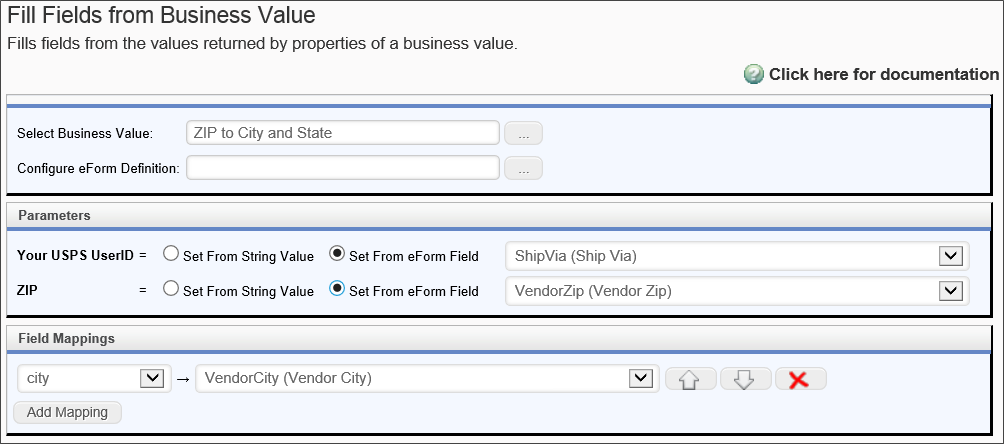
| Select Business Value | A ContentPicker that enables you to choose the Business Value to use to extract the data. | |
| Configure Form Definition | A ContentPicker that enables you to optionally set parameters from a different form than the default container Form, if desired. The Custom Task will search for an instance of the selected form in the current process instance, and use the values from that Form. | |
| Parameters | An automatically generated list of the parameters required by the Business Value. | If the Business Value uses parameters, Process Director will display each parameter for the Business Value. You can set the parameter using a string value, or select a Form field that will supply the parameter's value. |
| Field Mappings | A list of all the Form fields to map to the Business Value. | To add a field to map to the Business Value, click the Add Mapping button. Each mapping will consist of a dropdown from which to choose the Business Value property to apply, and a dropdown from which to use the Form field whose value you wish to set. For users of Process Director v4.05 and higher, this Custom Task will fill array columns with a Business Value that returns a recordset. |
 Manipulate Array Data

When invoked on a Form, the Custom Task assumes the Form will be used as the Container Form, which is to say the Form that contains the original data to be copied. When invoked from a Process Timeline as a Custom Task activity, the Custom Task tab of the activity will contain a property named Set Container Form. This property enables you to choose the Form that will be used as the Container Form for the Custom Task. This Custom Task cannot be configured without a Container Form set.
Configuration Options
|
OPTION |
ATTRIBUTES |
DESCRIPTION |
|---|---|---|
|
Select Array |
List of arrays on the Form |
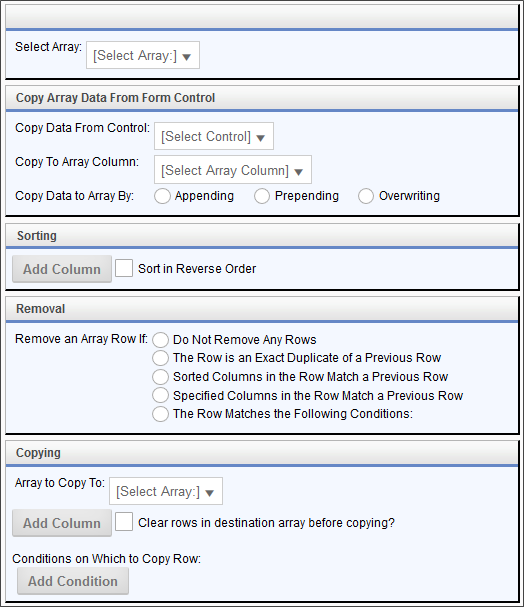
The array to which to apply the Custom Task operations. |
| Copy Data From Control | List of Form controls | The Form control from which data should be copied. |
| Copy To Array Column | List of Array columns | The Array column into which the data should be pasted. |
| Copy Data to Array By | Appending Prepending Overwriting |
How the data will be copied into the array. The data may be prepended by adding a row to the beginning of the array, appended by adding a new row to the end of the array, or overwrite the existing column data in the array. |
|
Sorting |
|
Click the Add Column button to choose the array column on which to sort. |
| Sort in Reverse Order | Checking this checkbox will sort the array in Descending order, rather than Ascending order. | |
|
Remove an Array Row If: |
Do Not Remove Any Rows |
Select the condition under which duplicate rows should be removed. |
| Array copy to |
List of arrays on the Form |
Choose the array to which the array values should be copied from the array you initially selected in the Select Array option. |
| Conditions on Which to Copy Row | Enables you to use the Condition Builder to determine the conditions under which a row will be copied. |
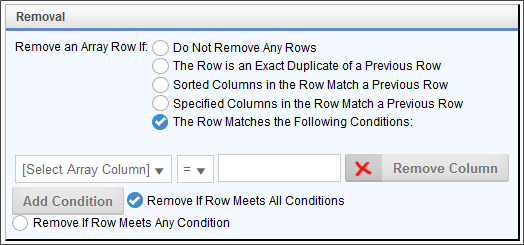
In the Removal section of the configuration screen, if you select the Remove Rows based on Conditions option, an Add Condition button and additional options will appear. Clicking the Add Condition button will add a conditions row that enables you to select an array field, operator, and enter a value to compare, so that you can remove a row based on the condition. Each condition row has a Remove Condition button to enable you to delete the row, if desired. Finally, you may then select whether to remove the row if it meets all of the conditions, or to remove the row if it meets any of the conditions in the list.

 Set Form Data
 This Custom Task was largely deprecated in Process Director v4.5 with the addition of the Set Form Data tab to both Form and Process Timeline definitions, which enable you to set Form Data directly, without invoking a Custom Task.
This Custom Task will set the value of fields on a Form. You can select the Form Control who's value you wish to set, then use System Variable or plain text in the Set Data To property to set the value of the specified Form Control.
Clicking the Add Control button enables you create additional control mapping rows for additional controls.

Configuration Options
|
OPTION |
ATTRIBUTES |
DESCRIPTION |
|---|---|---|
|
Data Source Form |
|
Picker control to select a form containing the data source, if any. |
|
Form Control |
|
The form control to set data (Container Form must be configured) |
|
Set Data To |
|
Data to set to Form Control |
Documentation Feedback and Questions
If you notice some way that this document can be improved, we're happy to hear your suggestions. Similarly, if you can't find an answer you're looking for, ask it via feedback. Simply click on the button below to provide us with your feedback or ask a question. Please remember, though, that not every issue can be addressed through documentation. So, if you have a specific technical issue with Process Director, please open a support ticket.

