Related Topics
Ideally, Process Director users on each installation should be synchronized via Active Directory/Entra or some other LDAP system, to ensure that the same users are available on all systems. Thus, when you assign a user to a task on your development system, the same user will be available, and assigned to the task automatically, when the application is imported into your production system. Similarly, when users are removed from your directory service, they are disabled automatically in Process Director on the next synchronization. Using a directory service is usually the most efficient method of managing users on multiple systems, especially for on-premises installations.
Customers on Cloud-based installations, however, may not wish to synchronize their user directories directly with the Process Director. Also, for systems with a smaller number of users, you might not want or need the overhead of synchronizing with a directory service. In that case, you might manually create the users on one system, then export the user list to other systems. In that case, Process Director enables you to export any number of users between systems, so you can pick one user, a small number of users, or all of them. Users can be exported or imported between systems using Excel files (.XLS, .XLSX or .CSV).
Exporting Users #
To export users, select one or more users from the User List, or select all users for the export. The users page shows a list of 100 users in the User List by default, so keep in mind that, if you have more than 100 users and you're trying to choose specific users to export, you won't see all of the users on your system.
Once the users are selected, click on the Export Users action link. An export box will appear that enables you to specify the name of the Excel file to which the list of selected users will be exported. A default name will be provided, but you can edit the default, at your discretion.
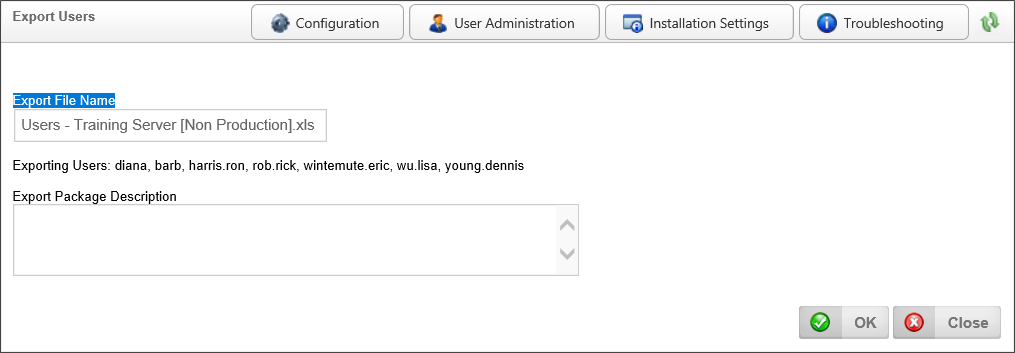
Once you have done so, click the OK Button to complete the export and create the Excel file.
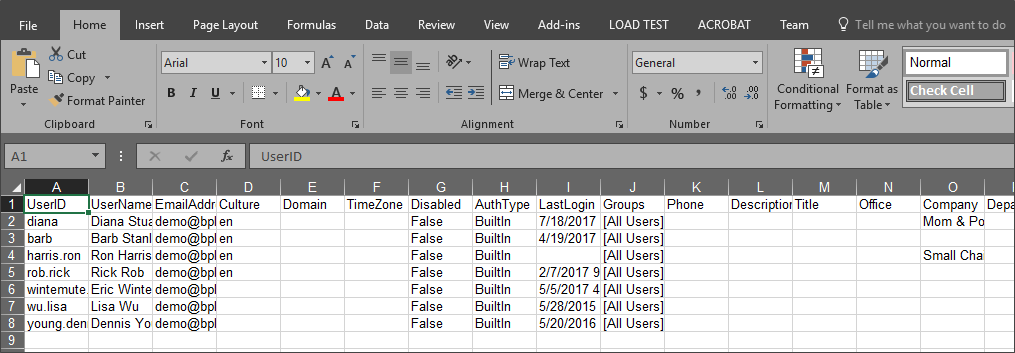
The available columns in the exported Excel file are described below.
|
COLUMN |
DESCRIPTION |
DEFAULT VALUE |
|---|---|---|
|
UserID |
This is required on an import. |
|
|
UserName |
The optional User Display Name. |
|
|
EmailAddress |
The users email address. |
|
|
Culture |
This is the optional culture for the user as defined by Windows (e.g. en). |
|
|
Domain |
The optional Windows AD domain for the user. |
|
|
TimeZone |
This is the optional time zone identifier for the user as defined by Windows (e.g. Pacific Standard Time). |
|
|
Disabled |
This indicates if the user is disabled. If this is set to “true” or “1” on an import it WILL disable the user. |
False |
|
AuthType |
The authentication type for the user. The authentication type can't be changed on an import. The available types are: Unknown, Built-In, Windows, LDAP, External, SAML, and Header. |
Unknown |
|
LastLogin |
This is only available on the user export, it isn't used on the import. |
|
|
Groups |
A comma separated list of groups this user belongs to. |
|
|
Phone |
The optional phone number of the user. |
|
|
Password |
This is only an option on the user import, the password is never exported. |
|
|
Description |
An optional description for the user. |
|
|
Title |
The optional title for the user. |
|
|
Office |
The optional office for the user. |
|
|
Company |
The optional company name for the user. |
|
|
BusinessUnit |
The optional business unit for the user. |
|
|
LegalEntity |
The optional legal entity for the user. |
|
|
Department |
The optional department for the user. |
|
|
Country |
An optional country for the user. |
|
|
Location |
This is an optional location string. |
|
|
CustomString |
This can be any string that should be associated with this user. |
|
|
CustomString2 |
This can be any string that should be associated with this user. |
|
|
CustomNumber |
This can be any numeric value. |
|
|
CustomDate |
This can be any date value. |
|
|
Manager |
This is the USERID or UID of the manager record. |
|
|
PasswordChange |
This indicates if the user should be required to change their password on the next login. |
False |
|
DayPass |
This indicates if the user is a “Day Pass” user. |
False |
| DeleteUser |
This is an optional column that will, when set to "DELETE" on a user's row, delete the user from the system.
|
 BP Logix strongly recommends that you disable, rather than delete users, to retain the user's activity history, but this is an available spreadsheet option, if needed.
Importing Users #
Once the Excel file has been exported, you can import the users to another system by transferring the Excel file between the systems.You may wish to edit certain attributes of the Excel file before importing it. When exporting/importing Built-in users between systems, the PasswordChange column, will, when set to 1", force the user to change the password on their next login.
Similarly, you can use your own Excel or CSV file to import new users. If you are importing users via your own Excel or CSV file, you must, as a minimum, have a UserID column for each record, but BP Logix recommends that you have the following columns in your file, with the appropriate data for the users in each row:
- UserID
- UserName
- EmailAddress
When using an Excel file for the import, the user data is usually on a worksheet named "Users". The Sheet Name property defaults to "Users" because, when you export users from Process Director, the system creates the "Users" worksheet automatically. If you are using a different sheet name, you'll need to change this property.
To import the file into the target system, navigate to the Users page again. Once there, click the Import Users action link. You'll be prompted for the Excel or CSV file to import.
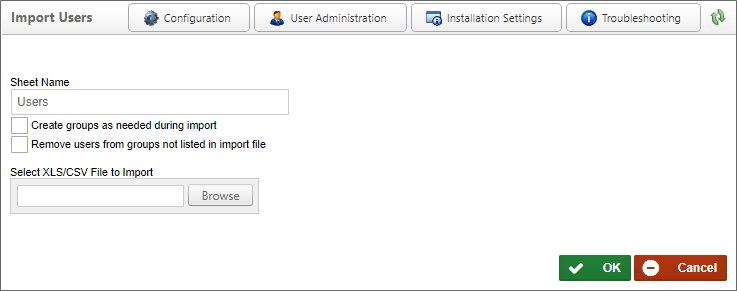
When importing an Excel file with users there are a couple options available.
- Create groups as needed during import
- Remove users from groups not listed in import file
The first option will automatically create and groups in the “Groups” column if they don't exist. The default is to add users to groups that exist, but not to create the groups. The second option will remove a user from an group that isn't listed in their “Groups” column.
Once you have selected the import file and set the desired properties for the import, click the OK button to begin the import. All of the users in the import file will be imported to the target system.
Group Exports
Navigating to the Groups page of the User Administration section enables you to export and import groups in Excel format, as well. This feature only exports or imports a simple list of groups, however. It does not provide any options for changing or updating any group memberships. Only the user import enables you to create or delete group memberships.
Documentation Feedback and Questions
If you notice some way that this document can be improved, we're happy to hear your suggestions. Similarly, if you can't find an answer you're looking for, ask it via feedback. Simply click on the button below to provide us with your feedback or ask a question. Please remember, though, that not every issue can be addressed through documentation. So, if you have a specific technical issue with Process Director, please open a support ticket.


