Related Topics
The BP Logix Visual Studio Plug-in integrates with Microsoft Visual Studio. It provides the ability to drag and drop Process Director Controls onto your forms. The easiest way to take advantage of the BP Logix Visual Studio Plug-in, use the fully functional Visual Studio project installed with the product named bpVS.zip. This project already has the plug-in installed and Intellisense enabled.
The following is a list of the features that are available to you in the plug-in.
Drag and Drop Control Editing. The plug-in adds an extension to the Visual Studio Toolbox giving you a list of all controls that are available to you in the Process Director library.
- Control Properties. Properties can now be set in the Properties box of the selected control.
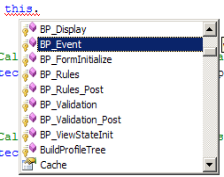
- Intellisense. All controls support full Intellisense to make the parameters easier to configure while in the Source View.
- Compile. Visual Studio will highlight compile errors.
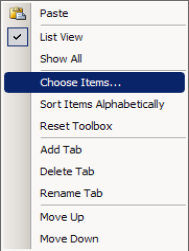
To enable this plug-in click on the menu item at the top named View > Toolbox. Once the toolbox is open right click in an open area and select “Add Tab”. Name the tab “Process Director”. Ensure the new tab is selected and right-click on the tab and select Choose Items from the list.

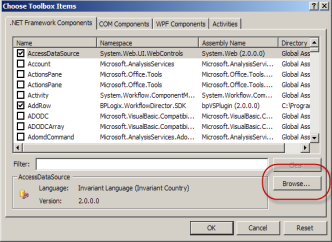
A dialog box will display, select the Browse button under the .Net Framework Components tab. The browse dialog box will appear. If you have Process Director installed, you'll find the DLL at “C:\Program Files\BP Logix\Process Director\”. If you only have the plugin installed, you can find the DLL at “C:\Program Files\BP Logix\Plugin\bpVS\Bin”. Once you've navigated to that folder, select “BPLogix.bpVSPlugin.dll”
Then click Open and OK.
 Some legacy elements in Process Director, which remain in the product for backwards compatibility, have a dependence on the .NET Framework v3.5, so you must install the v3.5 framework for the plug-in to work as expected. To add this .NET Framework version, click the Start button, click Control Panel, click Programs, and then click Turn Windows features on or off. Select .NET Framework 3.5 from the list of Windows features, then click the OK button to install it.
Restart your Visual Studio application for the complete changes to take effect.

After Visual Studio restarts, the plugin will populate the controls in the tab you created. You can now drag and drop the controls on the form in design mode or split mode only. You'll also be able to use the BP Logix Intellisense. By typing your code you'll start to see Process Director Controls, classes, etc. show in the list provided from the Intellisense.
To enable the Intellisense inside Visual Studio, you should create a stand-alone ASP.NET Web Application, and then add the BPLogix.bpVSPlugin.dll to the Bin directory of the project. To create new Forms or scripts, use Add New Item->Web User Control to create a new .ascx file. Do not place code in separate file. For Forms, you can switch into Design or Split view to drag and drop controls onto the visual form. You made need to build the application to enable the Intellisense. Ensure all Forms and script files have this line at the top of the file:
<%@ Control Language="C#" AutoEventWireup="false"
Inherits="BPLogix.WorkflowDirector.SDK.bpFormASCX" %>

Additionally, you can add the following registry key to set the location where the Plugin downloads temporary files (such as scripts and Forms) by setting the DocFolder property:
HKEY_LOCAL_MACHINE\SOFTWARE\BP Logix\Plugin\DocFolder
Or on a 64-bit operating system:
HKEY_LOCAL_MACHINE\SOFTWARE\Wow6432Node\BP Logix\Plugin\DocFolder
If you set this to a folder that is in your stand-alone Web Application, then you can use Check Out and Edit for Forms and scripts. When the files are opened in Visual Studio, they'll gain the benefit of Intellisense and compile-time error checking.
Documentation Feedback and Questions
If you notice some way that this document can be improved, we're happy to hear your suggestions. Similarly, if you can't find an answer you're looking for, ask it via feedback. Simply click on the button below to provide us with your feedback or ask a question. Please remember, though, that not every issue can be addressed through documentation. So, if you have a specific technical issue with Process Director, please open a support ticket.

