Related Topics
 Due to configuration changes made by Microsoft, your installation MUST be running v6.1.315 or higher for the connection to be successfully created and used by Azure.
 A PDF file for end-to-end Azure/Entra configuration for all Process Director features can be found here: Configuring Azure For Process Director (PDF Download)
Tenant-based SharePoint installations have a complex and more cumbersome access model than Site-based installations. Tenant-based installations, therefore, require a different process to set up and configure:
- Create a certificate to authenticate Process Director with Azure, using PowerShell, a command line utility included with all modern Windows OS versions.
- Add Process Director as a Registered Application in Azure.
- Configure the appropriate Azure settings.
- Add the public key certificate to the Process Director application in Azure.
- Configure the SharePoint Tenant Datasource.
In this topic, we'll address each of these required steps in detail. Additional information about this topic can also be obtained from Microsoft's online documentation.
Additional information for troubleshooting and automating certificate creation is provided at the end of this topic.
You cannot configure any OAuth settings for SharePoint Datasources or SMTP Email in Process Director until you have created and registered an Azure Active Directory Application in Azure by completing the steps described in this topic.
Create a certificate to authenticate Process Director with Azure #
Microsoft prefers the use of certificates for authentication. Each certificate includes both the public and private keys used to encrypt data. The public key (in a CER file) is used by SharePoint Online to authenticate Process Director. The private key is packaged in a password-protected PFX file and is used by Process Director to authenticate with Azure Services.
Keep in mind that certificates expire after a set period of time. Most organizations specify the maximum length of time certificates should be used. By default, the instructions that follow will generate certificates valid for one year. You should, therefore, generate and install new certificates well before existing certificates expire. This implies that your organization also has a mechanism in place to be reminded when expiration is approaching, to ensure that service interruptions don't occur.
Creating a Certificate with PowerShell
When configuring a SharePoint OAuth (Tenant) datasource in Process Director, a certificate is required for authentication with Azure AD. This guide describes how to generate a compatible certificate using PowerShell.
Do not use the certreq utility to generate certificates. Certificates generated with certreq use a legacy cryptographic provider (Microsoft Strong Cryptographic Provider) that is not compatible with all server environments and will result in an "Invalid Password: The certificate password is incorrect" error when configuring the datasource. Use a New-SelfSignedCertificate as described below.
There are two prerequisites for creating the certificate with PowerShell:
- Access to Windows PowerShell with the ability to Run as Administrator.
- Access to the Azure Portal for your tenant.
Follow the instructions below to create the certificate.
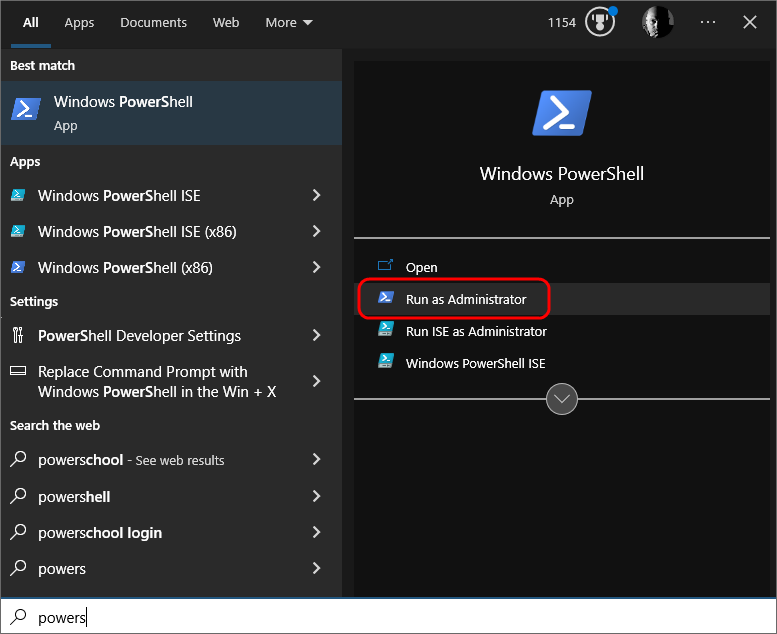
Open PowerShell by pressing the [WINDOWS] key, typing "PowerShell" then selecting the Run as Administrator option to open Windows PowerShell.
Step 1: Generate the Certificate
In PowerShell, create or navigate to the directory you'd like to use to store the certificate files. Once you're in the desired directory, run the following command:
$cert = New-SelfSignedCertificate -CertStoreLocation Cert:\LocalMachine\My -KeyAlgorithm RSA -KeyLength 2048 -KeyExportPolicy Exportable -KeyUsage DigitalSignature -Subject "CN=BPLogixPD-OAuth" -TextExtension @("2.5.29.37={text}1.3.6.1.5.5.7.3.2")
Step 2: Get the Certificate Thumbprint
Next, note and save the thumbprint for the certificate with the command:
Write-Host $cert.Thumbprint
Save this thumbprint — you will need it to verify the certificate in Azure AD.
Step 3: Set a Passphrase and Export the PFX (Private Key)
Run these three commands:
$pwd = ConvertTo-SecureString -String 'YourPassphraseHere' -Force -AsPlainText
$path = 'cert:\LocalMachine\My\' + $cert.Thumbprint
Export-PfxCertificate -cert $path -FilePath C:\temp\PrivatePublicKeys.pfx -Password $pwd
Replace YourPassphraseHere with a strong passphrase of your choice. You will need this passphrase when configuring the datasource in Process Director.
Step 4: Export the Public Key (CER) for Azure AD
Run this command to export the PublicKey.cer file:
Export-Certificate -cert $path -FilePath C:\temp\PublicKey.cer
Add Process Director to Azure #
To add Process Director as an application in your Azure Active Directory portal at the Tenant level, complete the steps below after signing into your Azure portal (portal.azure.com):
- If you have access to multiple tenants, use the Directories + subscriptions filter in the top menu to switch to the tenant in which you want to register the application.
- Search for and select Azure Active Directory.
- Under Manage, select App registrations > New registration.
- Enter a display Name for your application, e.g., “Process Director”. This name can be changed later, if needed.
- Specify who can use the application. Typically, only accounts in this organizational directory should be used. See the Microsoft documentation titled Quickstart: Register an application with the Microsoft identity platform for more information.
- Add the Redirect URI, which is the URI for your Process Director installation, e.g., https://myorg.bplogix.net.
- Click the Register button to register the application.
- Go to the Azure Portal > App Registrations > select your application
- Navigate to Certificates & secrets > Certificates
- Click Upload certificate and select the C:\temp\PublicKey.cer file you created in Step 4 of the certificate instructions
- Verify that the thumbprint shown in Azure AD matches the thumbprint from Step 2
Your AAD Application should now be properly registered and secured with a certificate.
-
Create a new Datasource object.
-
Set the Datasource Type to SharePoint OAuth (Tenant).
-
Enter the SharePoint Site URL.
-
Enter the Client ID. This will be the Application ID from Azure.
-
Enter the Tenant ID.
-
Upload the
.pfxfile you created in Step 3 of the certificate creation instructions above. -
Enter the Certificate File Passphrase you chose in Step 3 of the certificate creation instructions above.
-
Set the SharePoint Certificate File (*.pfx) property by clicking the Browse button to find and upload your certificate to the Datasource.
-
Click the Save button, then click the Test Connection button to confirm the Datasource is connecting to Azure.
Conclusion
Congratulations! Assuming that you've correctly followed the instructions above, you've now configured an Azure Integration with Process Director. To complete the integration, you'll need to perform some additional, specialized configuration in Azure, which is covered in the Create a Sharepoint data source topic.
Common Error Troubleshooting #
| ERROR | CAUSE | SOLUTION |
|---|---|---|
| Invalid Password: The certificate password is incorrect | Certificate was generated with certreq or another tool that uses a legacy cryptographic provider (CSP) | Regenerate the certificate using the New-SelfSignedCertificate steps above |
| Invalid provider type specified | Certificate PFX contains an unsupported cryptographic provider | Regenerate the certificate using the New-SelfSignedCertificate steps above |
Automating the Certificate Script #
For convenience, the complete script to create new certificates can be saved as a powershell script (.ps1) file with the following script:
$cert = New-SelfSignedCertificate -CertStoreLocation Cert:\LocalMachine\My -KeyAlgorithm RSA -KeyLength 2048 -KeyExportPolicy Exportable -KeyUsage DigitalSignature -Subject "CN=BPLogixPD-OAuth" -TextExtension @("2.5.29.37={text}1.3.6.1.5.5.7.3.2")
$pwd = ConvertTo-SecureString -String 'YourPassphraseHere' -Force -AsPlainText
$path = 'cert:\LocalMachine\My\' + $cert.Thumbprint
New-Item -ItemType Directory -Path C:\temp -Force | Out-Null
Export-PfxCertificate -cert $path -FilePath C:\temp\PrivatePublicKeys.pfx -Password $pwd
Export-Certificate -cert $path -FilePath C:\temp\PublicKey.cer
Write-Host "Certificate generated successfully."
Write-Host "Thumbprint: $($cert.Thumbprint)"
Write-Host "PFX exported to: C:\temp\PrivatePublicKeys.pfx"
Write-Host "CER exported to: C:\temp\PublicKey.cer"
Save the PowerShell script as GenerateCert.ps1.
Once the script has been saved, you can run it from an elevated PowerShell session as an Administrator with the command:
Set-ExecutionPolicy -Scope Process -ExecutionPolicy Bypass
& "C:\path\to\GenerateCert.ps1"
Documentation Feedback and Questions
If you notice some way that this document can be improved, we're happy to hear your suggestions. Similarly, if you can't find an answer you're looking for, ask it via feedback. Simply click on the button below to provide us with your feedback or ask a question. Please remember, though, that not every issue can be addressed through documentation. So, if you have a specific technical issue with Process Director, please open a support ticket.


